linuxで簡単にVPNを作る話
はじめに
今日もクラウドサービスにサーバ作っているネバー・フレンズ・Tです。
VPN利用がいろいろなところでカジュアルに叫ばれている中、VPNってどう動くんだろう?と思ったことはないでしょうか?自分もVPNがどう動くのかを、むつかしいことは抜きにもっと手軽に知りたい!と思ってました。
今回はLinuxのtapデバイスを操って、AWS Client VPNやその他のVPNのソフトウェアを一切使わず、AWSに簡易VPNを手組みで建てて手元のLinux機と通信させることを試してみます。実は大仰なソフトウェアを使わなくても実はVPNってとっても簡単だね!ということを感じていただければうれしい次第です!
VPNって重要だね!
いろいろな環境から遠くのコンピュータ資源を利用する手段としてVPNがあります。最近は多様性の世の中から、いろいろな事情でVPNをつかわざるを得ない機会も増えてきている状況です。通信の中身を見られないようにしてまるでLANをつなげているような感覚で遠隔地の計算資源を操作/通信できるわけですから、そりゃ便利です。いまだとリモートワーク全盛ですので、VPNの恩恵なしにはCOVID対策と商売も両立できませんでした。
ただ、VPNのマニュアルを見ると、なんとなくどこもかしこも複雑そうですよね!だいたい複雑そうでブラックボックスな場所って、ちょっと放っておくと闇の使いからの脅威が入りやすい場所となってしまうのは、世間のお約束です。もし、使っているVPNが信用できなかったら…と思いをはせると、顔から冷や汗が吹き出し、心臓がキュンキュンするーっ!という気分になる人も多いと思ってます。自分も、まさか普段使っているVPNに闇の使いへのバックドアが開いていたら…と思うと、いろいろな心配事が交錯して夜も眠れません。
でも、安心してください!いざとなったら自分が信用できる方法だけ使っても、手軽にVPNが作れることを知っておけばいいのです!
原理は簡単
VPNの接続の様子を図にしました。
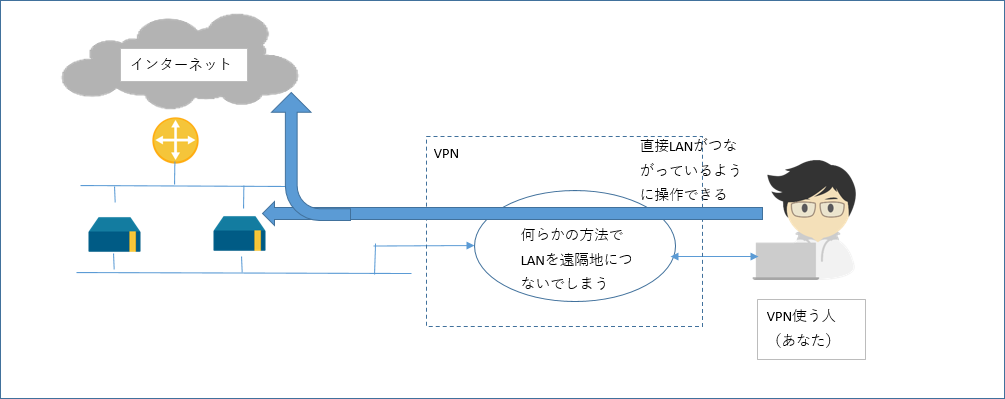
遠隔地のLANを何らかの方法でユーザの機材をつないでしまえればVPNはできてしまうということがわかれば、もうわかったも同然です。
実は接続先に端末ログイン可能なLinuxマシンが1台あれば、これとユーザの機材をネットワークとしてつなぐことで、あっという間にVPNの出来上がりです。こういった用途に便利なのはlinuxのtapデバイスとなります。
tapデバイスとは
一番わかりやすい説明はwikipediaのTUN/TAPとなります。読んでのごとくで、tapデバイスを作ると、こちらはまるでイーサーネットケーブルの端子のように扱えるようになります。ここに何らかのプログラムでパケットデータそのものを流し込むと、あら不思議!tapデバイスを作ったLinux機はここからやってきたパケットデータをネットワークから送られてきたパケットデータそのものと思い込んで、うっかり通常のTCP/IP通信としてあつかってくれます。
というわけで、先の図のユーザのマシンと、リモートのLinuxの両方にtapデバイスをおき、tapデバイス同士の間で、データを相互にそのまま流すことができれば、VPN通信ってできちゃうのでは?と思ったあなたはさすがです!
やってみた
理論上やれるなら、うっかりやってしまいたくなるのはエンジニアのSaGaです!やってしまいましょう!
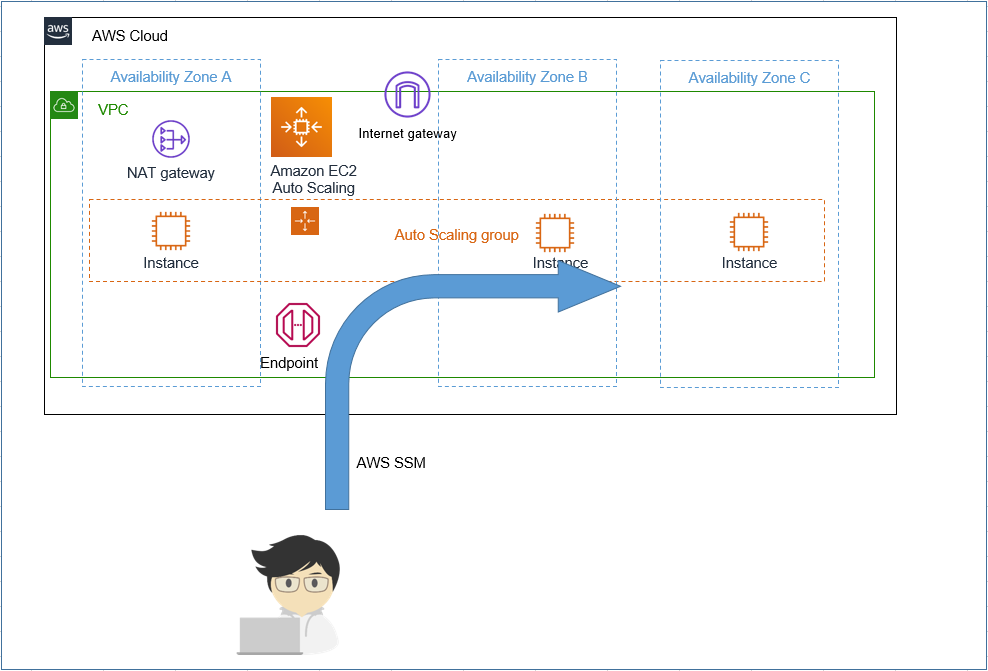
今回はよくあるAWSのEC2を置いたシステムの例を用意して、ここにVPNを即席に手組して用意するということをしてみます。例としてAWS(us-east-1)に置き、ローカルPCは日本においてssm経由でログインできるようにしておきます。
あとでssm経由のログイン経路をVPNの通信ルートとしてそのまま活用します。何か双方向に通信さえできれば、VPNだって簡単さ!ということを実感いただければと思ってます。
今回作成のAWSのEC2を置いたシステムの例は以下の図のとおりです。copyright-aws
terraformソース(リンク飛ばない人は「付録: terraformソース付録」の章までスクロール):
terraform.tf ec2.tf key_pair.tf
作成したら早速日本にあるローカルマシンからssmでログインしてログインができ、sshもssm経由で接続できることを確かめます。ここではwsl2(ubuntu 20.04)を利用しています。"(local pc)“とあるのは日本の手元にあるPCであり、"(remote linux)“とあるのはus-east-1(北米バージニア)にあるサーバとなります。
(local pc)$ uname -a
Linux localmachine 5.10.16.3-microsoft-standard-WSL2 #1 SMP Fri Apr 2 22:23:49 UTC 2021 x86_64 x86_64 x86_64 GNU/Linux
(local pc)$ lsb_release -dirc
Distributor ID: Ubuntu
Description:    Ubuntu 20.04.4 LTS
Release:        20.04
Codename:       focal
(local pc) aws ec2 describe-instances --filters "Name=instance-state-name,Values=running"\
 "Name=tag:Creator,Values=yours" --query 'Reservations[].Instances[].InstanceId'
[
    "i-0150812009b674018",
    "i-0645f52554510defb"
]
(local pc)$ aws ssm start-session --target i-0150812009b674018
Starting session with SessionId: yours@your.domain-0fbe0f1d3064c5cee
(remote linux)$ exit   #リモートにssmでログインできる。
(local pc)$ cat > ~/.ssh/config
# SSH over Session Manager
host i-* mi-*
    ProxyCommand sh -c "aws ssm start-session --target %h --document-name AWS-StartSSHSession --parameters 'portNumber=%p'"
<CTRL+D>
(local pc)$ ssh ubuntu@i-0150812009b674018
...中略...
To run a command as administrator (user "root"), use "sudo <command>".
See "man sudo_root" for details.

(remote linux)ubuntu@ip-192-168-0-186:~$
さらっと、AWS上のEC2インスタンスにssm経由のsshでつながりましたね!
あとで比較するため、リモート側の環境のglobal ipアドレスについて、地域情報をとっておきましょう。
(remote linux)ubuntu@ip-192-168-0-186:~$ curl https://ipapi.co/json
{
    "ip": "52.1.136.5",
    "version": "IPv4",
    "city": "Ashburn",
    "region": "Virginia",
    "region_code": "VA",
    "country": "US",
    "country_name": "United States",
    "country_code": "US",
    "country_code_iso3": "USA",
    "country_capital": "Washington",
    "country_tld": ".us",
    "continent_code": "NA",
    "in_eu": false,
    "postal": "20147",
    "latitude": 39.017388,
    "longitude": -77.468037,
    "timezone": "America/New_York",
    "utc_offset": "-0400",
    "country_calling_code": "+1",
    "currency": "USD",
    "currency_name": "Dollar",
    "languages": "en-US,es-US,haw,fr",
    "country_area": 9629091.0,
    "country_population": 327167434,
    "asn": "AS14618",
    "org": "AMAZON-AES"
}
ばっちりremote linux側はNAT-GWが北米にあることがわかりました。
さあ、いよいよVPNを手組で作っていきましょう。まずはlocal pc側にtap0デバイスを用意し、ここにデータの出し入れを行うツールのvde2を起動しておきます。
(local pc)$ sudo apt install vde2 uml-utilities ifupdown
(local pc)$ sudo usermod -a -G vde2-net $USER
(local pc)$ sudo -s -u $USER -H #;<-ログインしなおしでも可。
(local pc)$ id  # <-vde2-netのgroupが付与されたか?を確認
uid=1000(yours) gid=1000(yours) groups=1000(yours),4(adm),20(dialout),24(cdrom),25(floppy),27(sudo),29(audio),30(dip),44(video),46(plugdev),117(netdev),118(lxd),120(vde2-net)
(local pc)$ sudo -s -u root -H
(local pc)# cat > /etc/network/interfaces.d/vde2 <<__HERE
iface tap0 inet static
        address 192.168.1.3/24
        vde2-switch -
__HERE
(local pc)# ifup tap0
(local pc)# ip a
1: lo: <LOOPBACK,UP,LOWER_UP> mtu 65536 qdisc noqueue state UNKNOWN group default qlen 1000
    link/loopback 00:00:00:00:00:00 brd 00:00:00:00:00:00
    inet 127.0.0.1/8 scope host lo
       valid_lft forever preferred_lft forever
    inet6 ::1/128 scope host
       valid_lft forever preferred_lft forever
...中略...
5: tunl0@NONE: <NOARP> mtu 1480 qdisc noop state DOWN group default qlen 1000
    link/ipip 0.0.0.0 brd 0.0.0.0
6: sit0@NONE: <NOARP> mtu 1480 qdisc noop state DOWN group default qlen 1000
    link/sit 0.0.0.0 brd 0.0.0.0
7: tap0: <BROADCAST,MULTICAST,UP,LOWER_UP> mtu 1500 qdisc fq_codel state UP group default qlen 1000
    link/ether 5e:4b:bb:2a:84:82 brd ff:ff:ff:ff:ff:ff
    inet 192.168.1.3/24 brd 192.168.1.255 scope global tap0
       valid_lft forever preferred_lft forever
    inet6 fe80::5c4b:bbff:fe2a:8482/64 scope link tentative
       valid_lft forever preferred_lft forever

(local pc)# exit
(local pc)$
無事local pcに192.168.1.3というipアドレスをtap0デバイスに割り当て、vde2-switchを起動しました。これでvde2のコマンドを使うとtap0デバイス経由で双方向に生のパケットデータをやりとりできるようになります。
次にリモート側を用意します。こちらもまったく同じやり方でtap0デバイスを用意します。
(remote linux)$ sudo
(remote linux)$ sudo apt install vde2 uml-utilities ifupdown
(remote linux)$ sudo usermod -a -G vde2-net $USER
(remote linux)$ sudo -s -u $USER -H #;<-ログインしなおしでも可。
(remote linux)$ id  # <-vde2-netのgroupが付与されたか?を確認
uid=1000(ubuntu) gid=1000(ubuntu) groups=1000(ubuntu),4(adm),20(dialout),24(cdrom),25(floppy),27(sudo),29(audio),30(dip),44(video),46(plugdev),117(netdev),118(lxd),120(vde2-net)
(remote linux)$ sudo -s -u root -H
(remote linux)# cat > /etc/network/interfaces.d/vde2 <<__HERE
iface tap0 inet static
        address 192.168.1.2/24
        vde2-switch -
__HERE
(remote linux)# ifup tap0
(remote linux)# ip a
1: lo: <LOOPBACK,UP,LOWER_UP> mtu 65536 qdisc noqueue state UNKNOWN group default qlen 1000
    link/loopback 00:00:00:00:00:00 brd 00:00:00:00:00:00
    inet 127.0.0.1/8 scope host lo
       valid_lft forever preferred_lft forever
    inet6 ::1/128 scope host
       valid_lft forever preferred_lft forever
2: ens5: <BROADCAST,MULTICAST,UP,LOWER_UP> mtu 9001 qdisc mq state UP group default qlen 1000
    link/ether 0e:69:26:e6:5d:2b brd ff:ff:ff:ff:ff:ff
    altname enp0s5
    inet 192.168.0.186/27 brd 192.168.0.191 scope global dynamic ens5
       valid_lft 3557sec preferred_lft 3557sec
    inet6 fe80::c69:26ff:fee6:5d2b/64 scope link
       valid_lft forever preferred_lft forever
3: tap0: <BROADCAST,MULTICAST,UP,LOWER_UP> mtu 1500 qdisc fq_codel state UP group default qlen 1000
    link/ether 92:ce:a7:42:58:d0 brd ff:ff:ff:ff:ff:ff
    inet 192.168.1.2/24 brd 192.168.1.255 scope global tap0
       valid_lft forever preferred_lft forever
    inet6 fe80::90ce:a7ff:fe42:58d0/64 scope link tentative
       valid_lft forever preferred_lft forever
(remote linux)#
次にremote linux側でtap0デバイスに対してnatとip_fowardを有効にします。これで、tap0に来た192.168.1.0/24の通信は、もれなくnatでens5のIPアドレスに変換されてremote linuxのens5へ流れ出します。ens5デバイスがremote linux側のsubnet上にあるネットワークデバイスですので、tap0のipアドレスを全部ens5へipアドレス変換するというNATルールを記載してあげます。
(remote linux)$ sudo sysctl -w net.ipv4.ip_forward=1
net.ipv4.ip_forward = 1
(remote linux)$ sudo iptables -t nat -A POSTROUTING -o ens5 -s 192.168.1.0/24 -j MASQUERADE
それではいよいよtap0デバイス同士を直結します。直結にあたって、tap0デバイスの入出力を標準入出力につないでくれるという素敵コマンド群がvde2にはありますので、これをうまく使います。
(local pc) dpipe vde_plug -s /var/run/vde2/tap0.ctl = ssh ubuntu@i-0150812009b674018 vde_plug -s /var/run/vde2/tap0.ctl
意味としては、local pcと、remote linuxのtap0デバイス上のデータをvde_plugで引き出して標準入出力につなぎ、dpipeコマンドでお互いの標準入出力同士をssh経由で接続しなさい(’=‘の部分ですね)という意味です。
別の端末をlocal pcで開いてremote linuxのtap0デバイスのIPアドレス(192.168.1.2)にpingを送ってみます。
(local pc) $ ping 192.168.1.2
PING 192.168.1.2 (192.168.1.2) 56(84) bytes of data.
64 bytes from 192.168.1.2: icmp_seq=1 ttl=64 time=343 ms
64 bytes from 192.168.1.2: icmp_seq=2 ttl=64 time=172 ms
64 bytes from 192.168.1.2: icmp_seq=3 ttl=64 time=171 ms
^C
--- 192.168.1.2 ping statistics ---
3 packets transmitted, 3 received, 0% packet loss, time 2003ms
rtt min/avg/max/mdev = 171.447/228.544/342.667/80.696 ms
(local pc) $
おおー、たちまちremote linuxのtap0からping応答が帰ってきました。疎通しています。ssm+sshがVPNの通信経路に化けました。経路暗号化はssm+sshなので頑強のはず!よかったですね。
ではさらにlocal pcのrouteテーブルをいじってssm経由の通信はそのままで他は全部tap0経由にしてしまいます。ここでは、ローカルのIPアドレスは、aaa.aaa.aaa.aaaでマスクしています。default gwはaaa.aaa.aaa.1とします。
(local pc) $ ss -a | fgrep 443
tcp    ESTAB    0        0        aaa.aaa.aaa.aaa:47354         52.46.128.123:443
(local pc) $ ip route show | fgrep default
default via aaa.aaa.aaa.1 dev eth0
(local pc) $ sudo ip route add 52.46.128.123/32 via aaa.aaa.aaa.1 dev eth0
(local pc) $ sudo ip route delete default via aaa.aaa.aaa.1 dev eth0
(local pc) $ sudo ip route add default via 192.168.1.2 dev tap0
ではいよいよ、local pcからlocal pcのInternet Global IPアドレスはどこ?ということを確認してみます。
(local pc) $ curl https://ipapi.co/json
{
    "ip": "52.1.136.5",
    "version": "IPv4",
    "city": "Ashburn",
    "region": "Virginia",
    "region_code": "VA",
    "country": "US",
    "country_name": "United States",
    "country_code": "US",
    "country_code_iso3": "USA",
    "country_capital": "Washington",
    "country_tld": ".us",
    "continent_code": "NA",
    "in_eu": false,
    "postal": "20147",
    "latitude": 39.017388,
    "longitude": -77.468037,
    "timezone": "America/New_York",
    "utc_offset": "-0400",
    "country_calling_code": "+1",
    "currency": "USD",
    "currency_name": "Dollar",
    "languages": "en-US,es-US,haw,fr",
    "country_area": 9629091.0,
    "country_population": 327167434,
    "asn": "AS14618",
    "org": "AMAZON-AES"
}
(local pc) $
やりました!即席で作ったVPNでremote linuxを経由し、北米awsのsubnetを伝ってnat-gwから外部と通信できるようになりました!
ついでに2つ目のインスタンスにログインしてみます。2つ目のEC2インスタンスのip アドレスは192.168.0.123とのことなので、直接local pcからsshしてみます。
(local pc) $ ssh ubuntu@192.168.0.123
...中略...
The programs included with the Ubuntu system are free software;
the exact distribution terms for each program are described in the
individual files in /usr/share/doc/*/copyright.

Ubuntu comes with ABSOLUTELY NO WARRANTY, to the extent permitted by
applicable law.

To run a command as administrator (user "root"), use "sudo <command>".
See "man sudo_root" for details.

ubuntu@ip-192-168-0-123:~$
無事sshログインできました。これで、aws上の資源にlocal pcからであれば手組のVPNを経由してシームレスにアクセスができました。
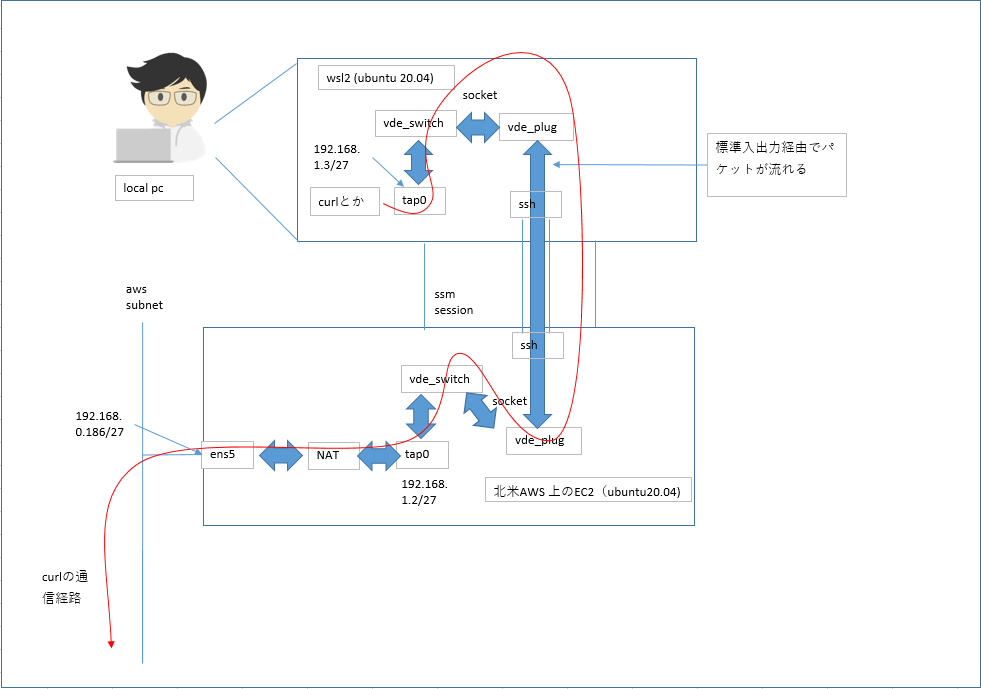
今回手組で作ったVPNを図示したものを載せます。
AWSからlocal pcへ接続したいんだけど…
本来であれば、LANまるごと双方向に疎通ができた方がよいわけで(L2延伸というらしいです)、VPNに詳しい人はそういうことはできないの?という疑問が出てくると思います。
aws上のEC2インスタンスにbridgeインターフェースを生やして(brctl addbr br0とか)、ens5とtap0を同じbridgeインターフェースにくっつけることができれば(brctl addif br0 ens5, brctl addif br0 tap0)、理論的には同じやり方でlocal pcをaws上のsubnetにVPN経由で直接出現させると、双方向にシームレスに通信させることができるはずです。
ところが、ens5をbridge インターフェースにくっつける(brctl addif br0 ens5)際、EC2上のens5が一緒に初期化されてしまうため、EC2インスタンスへのssmのsessionを失ってしまうようで、以降の操作が全くできなくなってしまうことが発生し、残念ながらうまく行きませんでした。
おそらく、最初からens5にbridgeをくっつけた状態でEC2インスタンスを起動できる方法があればうまくいくかも?とは思ってます。AWSではなく、KVMとかの手組みの仮想環境相手なら最初からNICとbridgeがbrctl addif済なので、本方式で問題なくできるのではないか?と考えてはいます。
おわりに
今回紹介のとおり、VPNなんてログインできるLinuxがあればコマンドライン程度で簡単に作れるということを実感いただけたらうれしいです。
もし何らかの理由でVPN環境が信用できないような状況に追いやられたら、こういう方法で手組でVPNできるよということを覚えていただければ、きっと有事の際にも役に立つかもと思っています。
商標表記
- Amazon Web Services, AWS, the AWS logo are trademarks of Amazon.com, Inc. or its affiliates.
付録: terraformソース
terraform.tf
// File: terraform.tf
// -*- coding: utf-8 -*-
// vim:fenc=utf-8 ff=unix ft=tf ts=2 sw=2 sts=2 si et :
terraform {
  required_providers {
    aws = {
      source  = "hashicorp/aws"
      version = "= 4.4.0"
    }
  }
  required_version = ">= 1.1"
}
provider "aws" {
  region = "us-east-1"
}
ec2.tf
// File: ec2.tf
// -*- coding: utf-8 -*-
// vim:fenc=utf-8 ff=unix ft=tf ts=2 sw=2 sts=2 si et :
//
// vpn experiment


locals {
  // your name
  myname = "yours"
  // endpoints for ssm
  ssm_endpoints = ["ssm", "ec2messages", "ec2", "ssmmessages", "kms", "logs"]
  // ubuntu 20.04LTS x86_64 official image
  img_owner_id  = "099720109477"
  img_name_part = "ubuntu/images/hvm-ssd/ubuntu-focal-20.04-amd64-server-*"
  // permit role
  permit_roles = ["arn:aws:iam::aws:policy/AmazonSSMManagedInstanceCore",
  "arn:aws:iam::aws:policy/AmazonS3FullAccess"]
  // how many instance?
  num_of_ec2s                = 2
  placement_bits_per_network = 3
  // vpc cider
  vpc_cidr = "192.168.0.0/24"
  // split out subnets according to a-z
  az_idxes             = ["a", "b", "c"]
  global_private_idxes = ["g", "p"]
  subnet_defs = { for gp_idx in range(length(local.global_private_idxes)) : local.global_private_idxes[gp_idx] =>
    { for idx in range(length(local.az_idxes)) :
      local.az_idxes[idx] =>
      { cidr = cidrsubnet(local.vpc_cidr, local.placement_bits_per_network, idx + gp_idx * length(local.az_idxes))
        az   = format("%s%s", data.aws_region.current.name, local.az_idxes[idx])
  } } }
  subnet_defs_for_gen_array = [for gp_idx in local.global_private_idxes : { for k, v in local.subnet_defs[gp_idx] :
  format("%s_%s", gp_idx, k) => v }]
  subnet_defs_for_gen = merge(local.subnet_defs_for_gen_array...)
  subnet_ids = { for gp_idx in local.global_private_idxes : gp_idx => [for idx in local.az_idxes :
  aws_subnet.vde2_test_lan[format("%s_%s", gp_idx, idx)].id] }
}
// current region
data "aws_region" "current" {}

// definitions for iam
data "aws_ami" "ec2" {
  most_recent = true
  filter {
    name   = "name"
    values = [local.img_name_part]
  }
  owners = [local.img_owner_id]
}

data "aws_iam_policy_document" "ec2" {
  statement {
    actions = ["sts:AssumeRole"]
    principals {
      type        = "Service"
      identifiers = ["ec2.amazonaws.com"]
    }
    effect = "Allow"
  }
}

resource "aws_iam_role" "ec2" {
  name               = "vde2_test_ec2_role"
  path               = "/"
  assume_role_policy = data.aws_iam_policy_document.ec2.json
}

resource "aws_iam_instance_profile" "ec2" {
  name = "vde2_test_ec2_profile"
  role = aws_iam_role.ec2.name
}

resource "aws_iam_role_policy_attachment" "ec2" {
  for_each   = toset(local.permit_roles)
  role       = aws_iam_role.ec2.name
  policy_arn = each.key
}

// definitions for local network
resource "aws_vpc" "vde2_test_lan" {
  cidr_block           = local.vpc_cidr
  enable_dns_support   = true
  enable_dns_hostnames = true
  tags = {
    Name    = "vde2_test_lan"
    Creator = local.myname
  }
}

resource "aws_subnet" "vde2_test_lan" {
  for_each          = local.subnet_defs_for_gen
  vpc_id            = aws_vpc.vde2_test_lan.id
  cidr_block        = each.value.cidr
  availability_zone = each.value.az
  tags = {
    Name    = format("vde2_test_subnet_%s", each.key)
    Creator = local.myname
  }
}

resource "aws_eip" "natgw" {
  vpc = true
  tags = {
    Name    = format("eip_for_vde2_test")
    Creator = local.myname
  }
}
resource "aws_route_table" "natgw" {
  vpc_id = aws_vpc.vde2_test_lan.id
  route {
    cidr_block     = "0.0.0.0/0"
    nat_gateway_id = aws_nat_gateway.natgw.id
  }
  tags = {
    Name    = "vde2_test_lan_natgw_rbt"
    Creator = local.myname
  }
}

resource "aws_internet_gateway" "igw" {
  vpc_id = aws_vpc.vde2_test_lan.id
  tags = {
    Name    = "vde2_test_igw"
    Creator = local.myname
  }
}

resource "aws_route_table" "igw" {
  vpc_id = aws_vpc.vde2_test_lan.id
  route {
    cidr_block = "0.0.0.0/0"
    gateway_id = aws_internet_gateway.igw.id
  }
  tags = {
    Name    = "vde2_test_igw_rbt"
    Creator = local.myname
  }
}

resource "aws_route_table_association" "igw" {
  for_each       = local.subnet_defs.g
  subnet_id      = aws_subnet.vde2_test_lan[format("g_%s", each.key)].id
  route_table_id = aws_route_table.igw.id
}

resource "aws_route_table_association" "natgw" {
  for_each       = local.subnet_defs.p
  subnet_id      = aws_subnet.vde2_test_lan[format("p_%s", each.key)].id
  route_table_id = aws_route_table.natgw.id
}

resource "aws_nat_gateway" "natgw" {
  allocation_id = aws_eip.natgw.id
  subnet_id     = aws_subnet.vde2_test_lan["g_a"].id
  tags = {
    Name    = "vde2_test_natgw"
    Creator = local.myname
  }
}

// ssm endpoint set to internal

resource "aws_security_group" "tcp443all" {
  name   = "vde2_test_ssm_sg"
  vpc_id = aws_vpc.vde2_test_lan.id
  ingress {
    from_port   = 443
    to_port     = 443
    protocol    = "tcp"
    cidr_blocks = ["0.0.0.0/0"]
  }
  egress {
    from_port   = 0
    to_port     = 0
    protocol    = "-1"
    cidr_blocks = ["0.0.0.0/0"]
  }
  lifecycle {
    create_before_destroy = true
  }
}

resource "aws_vpc_endpoint" "ssm_all" {
  for_each            = toset(local.ssm_endpoints)
  vpc_id              = aws_vpc.vde2_test_lan.id
  service_name        = format("com.amazonaws.%s.%s", data.aws_region.current.name, each.key)
  vpc_endpoint_type   = "Interface"
  security_group_ids  = [aws_security_group.tcp443all.id]
  subnet_ids          = local.subnet_ids.p
  private_dns_enabled = true
}

// ec2s
resource "aws_security_group" "ec2s" {
  name   = "ec2s"
  vpc_id = aws_vpc.vde2_test_lan.id
  ingress {
    from_port   = 0
    to_port     = 0
    protocol    = "-1"
    cidr_blocks = [local.vpc_cidr]
  }
  egress {
    from_port   = 0
    to_port     = 0
    protocol    = "-1"
    cidr_blocks = ["0.0.0.0/0"]
  }
  lifecycle {
    create_before_destroy = true
  }
}
resource "aws_launch_template" "ec2" {
  name          = "vde2_test_ec2_tmpl"
  image_id      = data.aws_ami.ec2.id
  instance_type = "t3a.micro"
  key_name      = aws_key_pair.this.key_name
  iam_instance_profile {
    arn = aws_iam_instance_profile.ec2.arn
  }
  block_device_mappings {
    device_name = data.aws_ami.ec2.root_device_name
    ebs {
      volume_size           = "10"
      volume_type           = "gp3"
      delete_on_termination = true
    }
  }
  network_interfaces {
    associate_public_ip_address = false
    delete_on_termination       = true
    security_groups             = [aws_security_group.ec2s.id]
  }

  tag_specifications {
    resource_type = "instance"
    tags = {
      Name    = "vde2_test_ec2_tmpl"
      Creator = local.myname
    }
  }
}

resource "aws_autoscaling_group" "vde2_autoscale" {
  name                      = "vde2_test_autoscale"
  max_size                  = local.num_of_ec2s
  min_size                  = local.num_of_ec2s
  health_check_grace_period = 300
  health_check_type         = "EC2"
  vpc_zone_identifier       = local.subnet_ids.p
  tag {
    key                 = "Name"
    value               = "vde2_test_ec2"
    propagate_at_launch = true
  }
  mixed_instances_policy {
    launch_template {
      launch_template_specification {
        launch_template_id = aws_launch_template.ec2.id
        version            = aws_launch_template.ec2.latest_version
      }
    }
    instances_distribution {
      on_demand_base_capacity                  = 0
      on_demand_percentage_above_base_capacity = 0
      spot_allocation_strategy                 = "lowest-price"
      spot_instance_pools                      = 1
    }
  }
}
key_pair.tf
// File: key_pair.tf
// -*- coding: utf-8 -*-
// vim:fenc=utf-8 ff=unix ft=tf ts=2 sw=2 sts=2 si et :
resource "aws_key_pair" "this" {
  key_name   = "yours-key"
  public_key = "...あなたのssh公開鍵..."
}